The following case study shall try to describe the use of LogView Studio a little bit more pragmatic.
The situation
A user has an electric model airplane, two batteries, a charger and a data logger (= telemetry). Now he would now like to collect data about the flights but also get and collect information about his batteries.
Projecting
The first step now is to think about how to organize the one (or even different) project(s) for this purpose.
Note
The organization of a project remains the task of the User and his preferences. LogView Studio offers with the project structure just a flexible framework to combine interrelated data into one project.
The following basic ideas are possible:
| • | One Project "Airplane" The project needs two Devices "Charger" and "Data logger" which have to be added. All data will be collected with these two devices. The collected data are then sorted in folder structures. |
| • | Two Projects "Charger" and "Data logger" One Project for the Charger and one project for the data logger will be created and the data will be collected and stored in different projects. Then there is no direct relation to be made possible between the data of the telemetry and the batteries, but in case this is not relevant for the User this is a possible solution. |
| • | Two Projects, one for each battery In this scenario each project "Battery 1" and "Battery 2" will get a device "Charger" und "Data logger". But the collection and storing of the data will be done for each battery separately. |
You see already in this rather simple example that there are various options in LogView Studio to setup and arrange your projects. There are not any rules or restrictions given to the user. A project consists finally of such elements which seems to make the most sense to the User.
We will continue the description only for the first option "Airplane" now.
Start LogView Studio and create the project
To start LogView Studio is the most easy step once you have read the <Quickstart> chapter of this Help file. Most simple option is to start 'LogView Studio' from the Windows Start Menu. Alternatively you can start the 'LvGui.exe' using a File Explorer.
Next step is to create the new project via File -> New -> Project (alternatively in the LogView Studio Wizard click on 'New Project')

Enter a project title in the LogView Studio Wizard and select a suitable folder of the hard drive's Filesystem (available empty folders are marked with a green dot).
The project name should reflect the content of our planned project. All data of the project including the database will be stored in this folder. (It must be empty before a project can be created in it.)
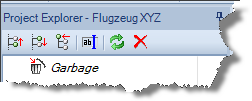
After click on 'Finish' the creation process of the project will be started by the Wizard and the progress can be observed. Various messages will appear, the database will be started and various template files will be copied into the project folder until finally the Wizard window will close itself. When the project has been created successfully the headline in the Project Explorer will change and display the Project name. Furthermore the first and only entry in the Explorer tree shall be the 'Garbage' trash can:
Add Devices to the Project
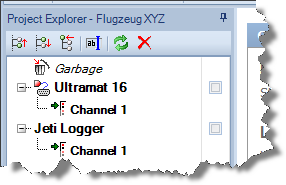
Select 'Device' in the 'Project'-Menu and add the Charger as device. Also select and configure the related Source in the same step. In our sample the device is a 'Graupner Ultramat 16' and a serial port COM22 as source configuration. (The User must choose his own configuration.) Confirm the dialog with 'OK'.
Now add the data logger (or telemetry analysis) in the same way. Click on 'Device' and select the 'Jeti Logger' as device to be added. The source leave open at this point. Confirm with 'OK' and the devices have been added.
Note
The devices in this sample project are just examples. If you want to replicate this sample project you should select your own available devices and ports.
The screen should now look like the following sample screen:
Add Folder to the Project Tree structure
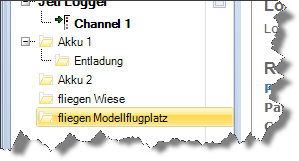
Actually we have now a project with two devices added. In order to keep a good overview with the expected datasets we will now add some additional folder. They will be used later.
Select in the 'Project' Menu the icon 'Folder' in the 'Organize' section. In the next window enter the folder name - e.g. 'Akku 1' - and confirm with 'OK'.
If an existing Folder is highlighted then the selection of the 'Folder' icon will create a sub folder to the highlighted folder. Also possible is to use the context-menu of the Project Explorer (right mouse-click).
After adding some folder the structure of the Project should look similar as to the following sample screen:
Now the basics of the Project is already configured to our (Project-)requirements and we can start receiving the data ...
The Charger
Our virtual User now start to prepare his rechargeable batteries with the battery Charger. First step is to discharge 'Akku 1'. After that the same battery will be fully charged for the next flight.
The battery is connected to the charger and the charger is connected to the Computer. The Charger entry in LogView Studio is activated (![]() ) in order to receive the related data. Then the Charger can be started to run his discharging process once and then the charging process of the battery. Our 'Ultramat 16' device should now look similar to the following Screenshot sample:
) in order to receive the related data. Then the Charger can be started to run his discharging process once and then the charging process of the battery. Our 'Ultramat 16' device should now look similar to the following Screenshot sample:

Now the User like to sort all datasets of 'Akku 1' in the folder 'Akku 1'. As the discharging process is normally not used very often our User like to store this in a sub folder 'Entladung' (Discharging).
This can be done with the Drag-and-Drop function: click and hold down the left mouse key on the dataset 'Discharge Mode' and then move the dataset to the folder below the folder 'Entladung'. A black line with a little arrow indicate the position.
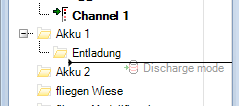
Now release the mouse key and the dataset has been moved to that folder - similar as it works in Windows Explorer.
The same procedure will be done with the dataset 'Charge Mode' - but this dataset should be moved to the folder 'Akku 1'.
The project structure should now look like following screen sample:
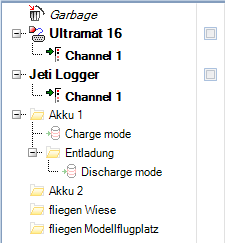
In the next step our User will load the second battery with the same Charger. The dataset will be received in LogView Studio again via Channel 1 of the 'Ultramat 16'.
But this time the User like to see the actual graphic chart and the last data of the second battery charge process. For this purpose he add a 'Live Chart' and a 'Live Text' to the Channel 1 of the Ultramat 16 Charger:

As soon as these 'Live Views' are activated they show the last data from the database and will update their display periodically.
After starting the Charging process, activating the device and the two Live Views with their checkboxes, the charging process of 'Akku 2' in LogView Studio may look like the following Screenshot sample:
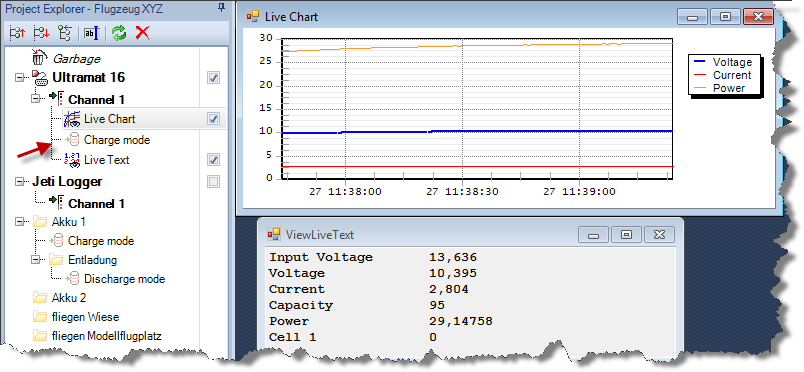
The 'Live Chart' shows the charging process like an oscilloscope with a diagram and the 'Live Text' shows he latest actual values in text form.
Additionally a new dataset was created automatically (after receiving the first data from the Charger) called "Charge mode".
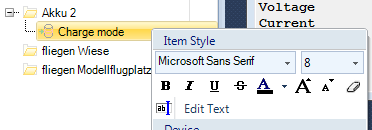
When the charging process was finished, our User moves the dataset to folder 'Akku 2'. Using the context-menu (right mouse click) the name and style can be adjusted to the personal preferences (green text, bold, adding a date to the text):
 ->
-> 
Preliminary result
The User has used his batteries and moved (and stored) the results in the folder tree. Furthermore he observed the data flow from the charger in two different Live View screens.
The User flew the model - flight data (telemetry) are available
Now the advantages of LogView studio become obvious when using different devices. The user can import various data into the same project which are somehow related to the batteries and also to the charge procedures but coming from complete different devices.
The User has flown the model on his lawn ('fliegen Wiese'), used the 'Akku 1' and produced a related telemetry data Logfile. The Logfile can be imported by double click on 'Jeti Logger'.

In the dialog window 'Device and Source' the User select as the source (in this case it is a file) the telemetry Logfile and confirms with OK. The Logfile will be imported immediately and will be added to the project as separate dataset under Channel 1 of the 'Jeti Logger':

To keep the project in good order this dataset was moved to the correct position in the folder tree as well and the title was modified adding the information of the used battery 'Akku 1':
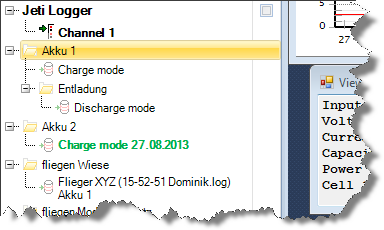
After that the User went to the model airfield and flow down the second battery 'Akku 2' and also took logging data of the telemetry. Again he can double click on the 'Jeti Logger' and does not need to add a new device. In the device dialog the User selected as Source the new file and confirms with OK. The new Logfile will be imported similar as the first Logfile. Also this dataset can be moved to the folder model airfield ('fliegen Modellflugplatz') and the info 'Akku 2' was added to the title:

Analysis with (static) Views
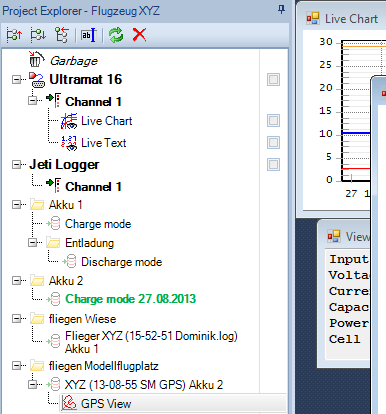
Finally the User like to see additionally a static view of the last telemetry GPS data. He select the related dataset (highlight) and then select 'GPS 3D' in the Views section of the 'Project' menu.
Now the project should look like following sample Screenshot:
All following battery charging processes or telemetry data files can be handled similar and added to this project as well.
Summary
The above theoretic example gives hopefully a better insight view to the options of LogView Studio and how it could be (or should be) used. The advantage are very clear located in the possibility to handle more than one device simultaneously (or in row) and to structure the collected data in a common project - fully flexible according to the Users preferences.
In case you need further informations you are kindly invited to connect to our Forum under www.logview.info where also questions can be placed.